Setting up Minecraft behind CloudFlare and a reverse Proxy
Note that this guide expects that you have purchased a domain name, and have an existing minecraft server already set up. Also note, so long as you have paid for your Domain Name, none of the steps in the guide will cost you any more money.
The guide will go as follows:
Setting up your Cloud Account and OCI
You can set up a cloud server with any provider (aws, azure, google, digitalocean, etc…). I have chosen Oracle’s “Always Free Tier” because it is Free. Other providers have similar services, however most relevant products expire after a year or less. Only Google and Oracle have servers/nodes that render free FOREVER. I’ve included links to their listings below if you would like to pick a different one:
If you have picked another cloud provider, spin up a small centos 7 instance and skip to the next step. Note you will need to run commands provided in the config to which this links.
We are using a cloud server as another buffer between the client and our network. Once you have created an account, we will use the OCI to spin up an instance. Note that you will need to provide a credit card as proof of identity/verification. There will be a $.01 charge, but otherwise no cost so long as you only provision items in the always free category.
For the setup you are welcome to provision the device through the GUI. I will list the CLI steps below.
First you need to install the oci cli for interacting with your cloud account. This can be installed with the following one liner. After the install, source your bashrc as they will update your path to include the binary.
$ bash -c "$(curl -L https://raw.githubusercontent.com/oracle/oci-cli/master/scripts/install/install.sh)"
$ source ~/.bashrc
Next begin the setup with the following command to configure the oci cli for your account. It will walk you through where to find the required information. (Very simple, require’s 2 ID’s from your account and the region)
$ oci setup config
For simplicity, we will add a few more configurations such as the default compartment for oci. First we need to locate the OCID for the compartment. In the Oracle Cloud Console, click the top left three bars, and scroll to the bottom where it says ‘Identify’ and click ‘Compartments’.
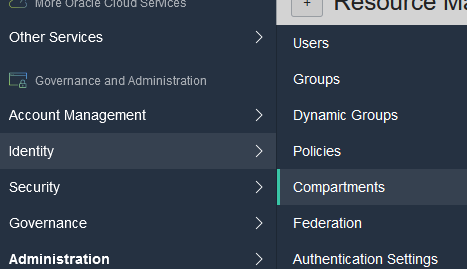
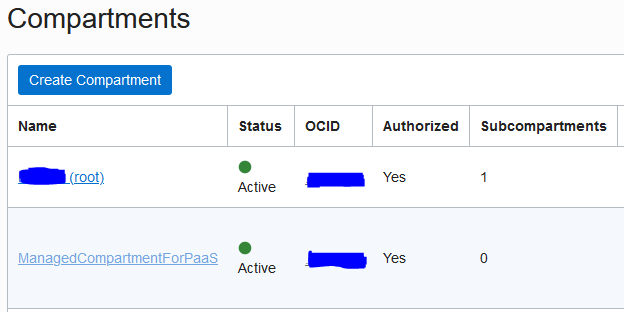
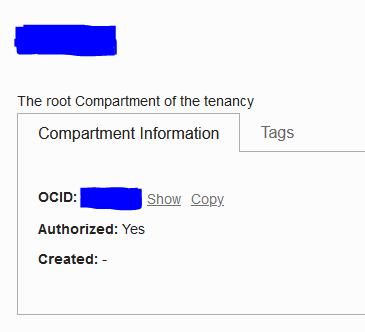
From there, you will see a list of compartments, click the root compartment, then in the main tab on the new page where it says OCID, click copy. As this is a free tier and likely the only VM we will use, we will use the root compartment. If you plan on expanding beyond that, you may want to consider creating other subcompartments to use instead.
| Find the Root Compartment | Copy the Compartment ID |
|---|---|
 |
 |
Paste the output you copied into the following command.
$ echo -e "[DEFAULT]\ncompartment-id=<PASTE THE OCID YOU COPIED HERE>" > ~/.oci/oci_cli_rc
To check what the default compartment for your oci instance is, run the following
$ oci iam compartment get --output table --query "data.{CompartmentName:\"name\"}"
Building the Instance and VCN with OCI
For this next portion, I will use jq. You may need to install jq with your package manager, depending on the distro you use. jq is a simple json parser/constructor.
Ubuntu: sudo apt install jg -y
Fedora: sudo dnf install jq -y
Arch:   sudo pacman -Sy jq
-
Create a virtual cloud network (vcn). Then we assign the ID of that network to a variable, as we will be calling it a lot more down the line.
$ OCID=$(oci iam compartment get --output table --query "data.{CompartmentName:\"name\"}") $ oci network vcn create -c ${OCID} --cidr-block 172.168.0.0/24 --display-name MinecraftVCN --dns-label MineVCN $ VCN_OCID=$(oci network vcn list | jq -r '.data[].id') -
Now we will create a new security list, this will allow traffic on port 25565/TCP and 22/TCP to the server. It will also allow the server to communicate out on the exnet. We then assign the ID to a variable.
$ oci network security-list create --display-name minesubnet --vcn-id ${VCN_OCID} -c ${OCID} --egress-security-rules '[{"destination": "0.0.0.0/0", "destination-type": "CIDR_BLOCK", "protocol": "all", "isStateless": false}]' --ingress-security-rules '[{"source": "0.0.0.0/0", "source-type": "CIDR_BLOCK", "protocol": 6, "isStateless": false, "tcp-options": {"destination-port-range": {"max": 25565, "min": 25565}}},{"source": "0.0.0.0/0", "source-type": "CIDR_BLOCK", "protocol": 6, "isStateless": false, "tcp-options": {"destination-port-range": {"max": 22, "min": 22}}}]' $ SL_ID=$(oci network security-list list --vcn-id=${VCN_OCID} | jq -r '.data[].id') -
Now we will create a public subnet. You have the option to add up to 5 security lists and a custom route table. Here we will assign the security list we just create and let the system associate with the default route table.
$ oci network subnet create --cidr-block 172.168.4.0/24 -c ${OCID} --vcn-id ${VCN_OCID} --security-list-ids "[\"${SL_ID}\"]" $ SN_ID=$(oci network subnet list --vcn-id ${VCN_OCID} | jq -r '.data[].id') -
Next create the gateway. This can be disabled/enabled to control whether the instances in the segment can access the inernet. It is created inside the VNC.
$ oci network internet-gateway create -c ${OCID} --is-enabled true --vcn-id ${VCN_OCID} --display-name MineGW $ GW_ID=$(oci network internet-gateway list --vcn-id ${VCN_OCID} | jq -r '.data[].id') -
Now we can update the route table with a route to the internet gateway we just created.
$ RT_ID=$(oci network route-table list --vcn-id ${VCN_OCID} | jq -r '.data[].id') $ oci network route-table update --rt-id ${RT_ID} --route-rules "[{\"cidrBlock\":\"0.0.0.0/0\",\"networkEntityId\":\"${GW_ID}\"}]\" - We can configure our instance when provisioned with cloud-init user data. We’ll create a file that will handle setting up sslh so that we don’t have to when we login. Copy and past the following into your terminal to create the init directory, and our subsequent file. Please be certain to change “{HOST IP HERE}” to the public IPv4 address of your minecraft server - otherwise, you’re gonna have a bad time.
If you have picked another cloud provider, and are continuing from there, after you run the below comands (parsed out of the config), proceed to here.
$ [[ -d $HOME/cloud-init ]]&& : || mkdir -v ~/cloud-init $ cat <<EOF>> ~/cloud-init/minecraftvm.cloud-config #cloud-config runcmd: - /bin/yum update -y - /bin/yum install epel-release -y - /bin/yum install sslh -y - /bin/firewall-cmd --add-port=25565/tcp --permanent --zone=public - /bin/firewall-cmd --add-port=25565/udp --permanent --zone=public - /bin/firewall-cmd --add-service=ssh --permanent --zone=public - /bin/firewall-cmd --reload - /bin/semanage port -a -t http_port_t -p tcp 25565 - /bin/sed -i 's/\(^ExecStart=\/usr\/sbin\/sslh\).*/\1 --user sslh --listen 0.0.0.0:25565 --anyprot {HOST IP HERE}:60000 --pidfile \/var\/run\/sslh.pid/' /usr/lib/systemd/system/sslh.service - /bin/sed -i 's/\(^Environ.*\)/#\1/' /usr/lib/systemd/system/sslh.service - /bin/systemctl daemon-reload - /bin/systemctl enable sslh - /bin/systemctl start sslh EOF -
Create the instance. We first pull some information, such as availability domain, image ID, and so forth. If you do not have an ssh-key already, please run
ssh-keygenbefore conituing. It may take sometime.$ AD_ID=$(oci iam availability-domain list | jq -r '.data[].name' | sed -n 1p) $ IM_ID=$(oci compute image list --operating-system "CentOS" --operating-system-version 7 --sort-by TIMECREATED --limit 1 2>/dev/null | jq -r '.data[].id') $ oci compute instance launch --availability-domain ${AD_ID} --display-name minecraft-proxy --image-id ${IM_ID} --subnet-id ${SN_ID} --private-ip 172.168.4.2 --shape VM.Standard.E2.1.Micro --assign-public-ip true --ssh-authorized-keys-file ~/.ssh/id_rsa.pub --user-data-file ~/cloud-init//minecraftvm.cloud-config - Verify the instance is online, and pull the public IP address. When it is online, the status will return as “RUNNING”. If you need to login, you can login as the opc user. Save the IP as you will need to use it when configuring the DNS records and port forward. When you login, you may consider adding some security adjustments, such as disallowing root login over ssh, installing fail2ban, or similar tasks.
$ CS_ID=$(oci compute instance list | jq -r '.data[].id')
$ oci compute instance get --instance-id ${CS_ID} --query 'data."lifecycle-state"'
$ oci compute instance list-vnics --instance-id ${SI_ID} | jq -r '.data[]."public-ip"'
Transfer your DNS records to CloudFlare
Cloudflare is a CDN (Content Delivery Network). A CDN is a large distributed network of servers around the globe. They provide several advantages for hosting content, such as caching static images, reducing bandwidth, hides the origin IP and more. In this case however, most of those features will be overlooked as cloudflare doesn’t support games unless you are willing to shell out a lot of $$. As such, we have configured a proxy host in the previous steps.
We will be adding an SRV record, which has the draw back of revealing your origin IP. However, this will be sent to our cloud server, which will proxy the traffic back to our actual minecraft server. For clarification, cloudflare’s purpose here is more for obfuscation at a DNS level. It also has the benefit, if you do have a site attached to the A Record, of applying it’s main perks there. The DDoS protection for your minecraft server will be covered by Oracle’s Cloud Infrastructure. If you are using AWS, the equivalent would be AWS Shield. Both of these services are baked in and auto apply when you spinup any instances, there is no configuration necessary. The two combined (cloudflare + reverse proxy), considering they are free, add a little more security and the benefit of allowing clients to connect directly over a domain name and resolve, instead of directly via an IP address and port. Since the traffic will be proxied through the cloud sever, no one should ever get your true public IP.
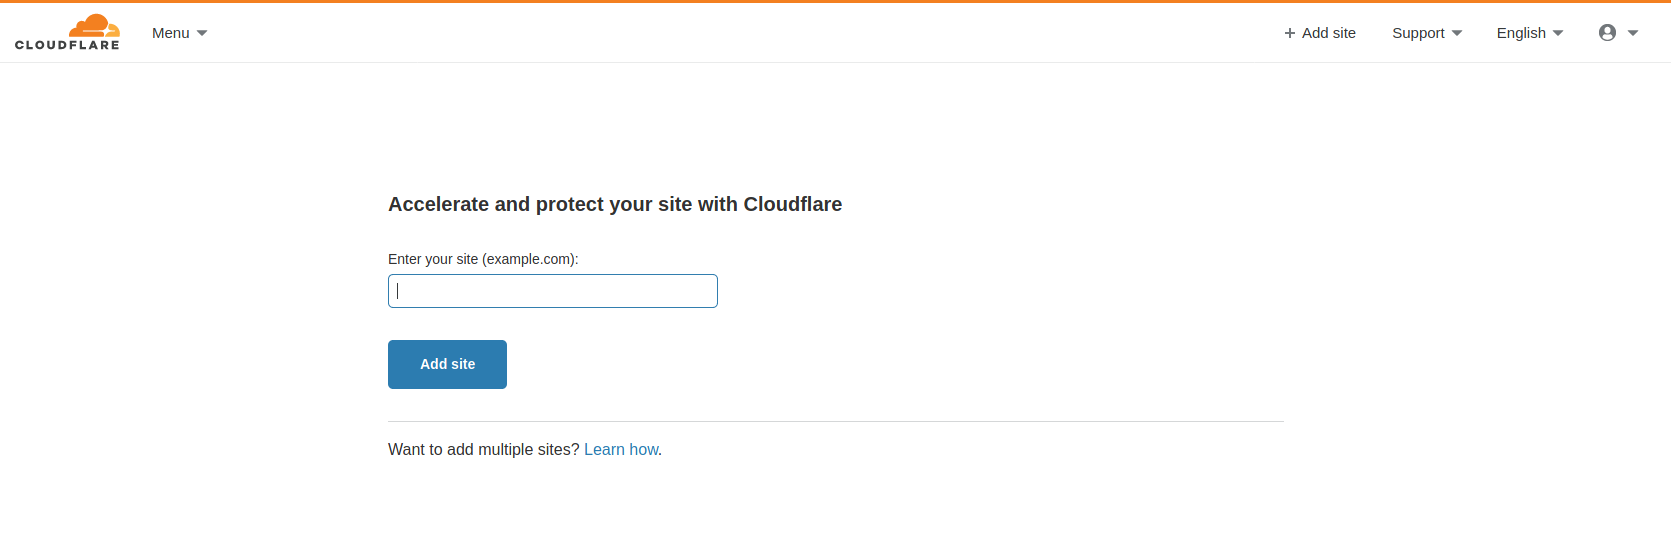
Sign up with CloudFlare here
Click the add site button at the top right, and add your domain as per below:
After you have added the domain, cloudflare will import all of the records. It will list steps on walking you through changing the registrars for the registrar you purchased the domain from. This may vary depending on where you purchased it.
Create an A and an SRV record
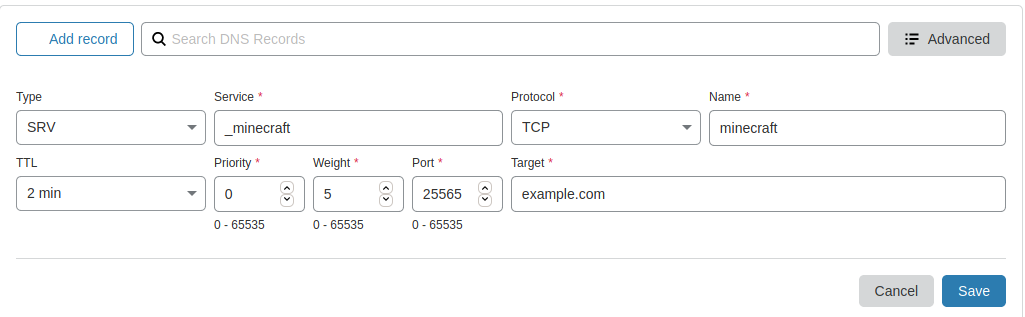
Navigate to your domain and click the DNS tab. Create an SRV record with the following parameters. Note in the example, the full domain someone would type in is “minecraft.example.com”. Substitute your domain name for example.com, and then feel free to change ‘minecraft’ to whatever subdomain you would like. Please be certain to have an A-Record created that points to your cloud server IP address.
The A Record (change to your IP/Domain)

The SRV Record
If you would like to verify that the DNS has been pulled to other resolvers, you can run the following dig command. Note that this command, if you do not have it, can be installed with the bindutils/tools package. In the example provided, I have substituted the real values for fake ones and private addresses. You should see the IPv4 address you set in your A record, this should match the IPv4 address on your cloud server. This may take sometime.
$ dig SRV _minecraft._tcp.minecraft.example.com +short
0 5 25565 dc-9bzed23c4121.example.com
$ dig +short dc-9bzed23c4121.example.com
192.168.1.1
Set up a Port Forward
The last step will be to add a port forward on your router. In most cases, your router is always at the IP address 192.168.1.1. Open that in your browser. You’ll need to look at the label on the back of your router for the login information, or look up the manufacturer’s guide online. If the password and user are something simple like admin, please do yourself a favor and change it to something else. In any case, there will be a menu or tab somewhere with a name similar to Routing & Firewall. Under that should be an option to add port forwarding rules. When you add a rule add the following information:
Name: Minecraft
Source: <Public IPv4 address of your Cloud Server>
Srouce Port: 60000
Dest IP/Port: <Private IP of your Minecraft Server>:25565
Note - depending on your router, it may need an additional firewall rule added to prevent people from connecting to your source IP (should ever accidentally leak it). I am currently using an Ubiquiti USG, which will auto add the whitelist for the portforward. If you are renting a router from your ISP, you will likely need to add one. In the same Routing & Firewall section, there will be a section for adding firewall rules. You would use the information from the above to fill out the section in adding a new rule. If for some reason there is no such capability on your router, you can add this as a rule on the server itself. Here are some linux examples, note that you would change the ‘xxx.xxx.xxx.xxx’ with your cloud server IP address.
Firewalld:
$ sudo firewall-cmd --permanent --zone=public --add-rich-rule='rule family="ipv4" source address="xxx.xxx.xxx.xxx/32" port protocol="tcp" port="25565" accept'
$ sudo firewall-cmd --permanent --zone=public --add-rich-rule='rule family="ipv4" source address="xxx.xxx.xxx.xxx/32" port protocol="udp" port="25565" accept'
$ sudo firewall-cmd --reload

Iptables:
$ sudo iptables -I INPUT -p tcp -s xxx.xxx.xxx.xxx/32 --dport 25565 -j ACCEPT
$ sudo iptables -I INPUT -p udp -s xxx.xxx.xxx.xxx/32 --dport 25565 -j ACCEPT

UFW:
$ sudo ufw allow from xxx.xxx.xxx.xxx/32 proto tcp to any port 25565
$ sudo ufw allow from xxx.xxx.xxx.xxx/32 proto udp to any port 25565
Once that is set, and DNS has been pulled across to all other resolvers, you should be good to go. Go into minecraft, enter your domain name into the server connect address, and have fun!
